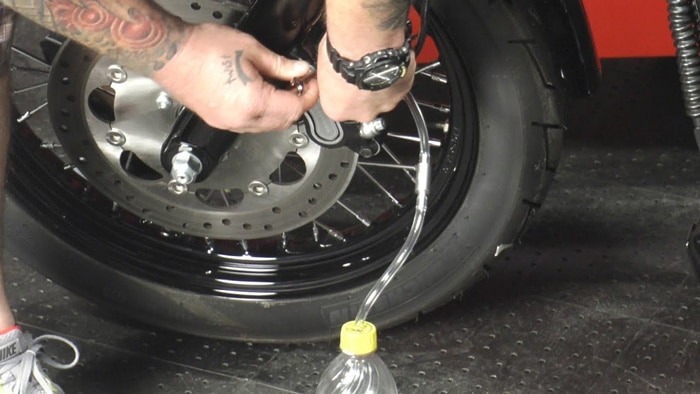
How to bleed motorcycle brakes?

If you are new to riding bikes and are really getting into it, you should know that sooner or later you will have to bleed your bike’s brakes. It is something you have to do now and then to ensure the brakes are performing optimally.
While bleeding your motorcycle’s brakes is not a difficult task, there are procedures you need to be aware of, particularly in light of safety. Read on to enlighten yourself on the techniques and tips that will make the entire brake bleeding process go smoothly.
Table of Contents
Why Would You Need to Bleed Motorcycle Brakes?
There are a variety of circumstances that would lead to a need for bleeding motorcycle brakes. The tell-tale signs you must watch out for include inconsistent braking, a reduction in braking power, and feeling a certain sponginess in the lever.
Should you notice any of these symptoms, it is time to ascertain the integrity of the braking system. Check the brake lines and banjo bolts to ensure there is no damage or leakage.
Damaged seals, loose banjo bolts, and cracked lines can result in leaks.
Air trapped in the brake lines is the reason you need to bleed the brakes. You see, the trapped air makes the brakes feel squishy or soft. Furthermore, if there is too much air in the braking system, brake failure will be the result.
Bleeding the air from the brake lines helps restore the brakes’ responsiveness.
During brake bleeding, you purge any air bubbles contained in the brake lines. The brake lines are the pipes and hoses that contain brake fluid.
You see, the presence of air bubbles in the brake system causes a reduction in the system’s hydraulic pressure.
Tools You Will Need:
When the system has been emptied completely (for instance, when replacing hoses), the brake bleeding procedure is a bit different.
In this article, we will assume an empty system so at to cover both periodic maintenance and complete fluid replacement.
1. Protect the Paintwork
The first step is removing the reservoir cap/top, and then filing the reservoir up to just below the top edge. To ensure any spillage is absorbed, place some absorbent rags around the reservoir. It is pertinent that you protect any paintwork (frame, front fender, gas tank) spillage.
There is a rubber sealing diaphragm underneath the reservoir top, which ensures the brake fluid is separate from the atmosphere. Note the purpose of air entering into the top of the reservoir is to replace the lowering brake fluid levels.
Next, pour brake fluid into the bleed bottle, as this will ensure the outlet pipe remains below the surface of the fluid. Place the wrench (ring end) onto the nipple first and then the rubber hose of the bleed bottle.
2. Brake Bleeding
Now that the various items are set in place and you have filled the reservoir, you can now commence brake bleeding.
When the system is empty, open the bleed nipple 1/3 of a turn and pump the lever repeatedly so as to send fluid into the brake hose. Make sure you keep topping off the fluid reservoir during this stage, since air can enter the system.
As the brake level is actuated, you will see bubbles emerge from the end of the bleed bottle’s tube. This is the air in the system, and it is being expelled by the new brake fluid.
Only when you are satisfied that the brake system is filled with fluid can you start on the final phase of the brake bleeding process. This last phase is the one that normally takes place during a service (rather than when the braking system is empty).
3. Ensure No Air Bubbles Leave the End of the Bleed Tube
Pump the brake lever about three times and then hold it in (brake applied position). Close the bleed nipple and repeat the pumping.
While the lever is in, open the bleed nipple and then close it. Repeat the process until there are no air bubbles leaving the bleed tube’s end.
Pump and hold lever in, open bleed nipple, tighten nipple, release lever.
Note that there are brake calipers which contain more than just one bleed nipple. With that type of system, always begin by bleeding the nipple furthest away from the reservoir.
When the brake bleeding process is complete, the lever will feel firm when you apply pressure and there will be no sponginess.
4. Removing Bleed Bottle
Take great care when removing the bleed bottle since the rubber hose contains brake fluid. The rubber hoses are likely to spring out, sending a bit of brake fluid into the air. Such spillages can cause serious damage to the paint or to your eyes.

If spillage happens on paint, wash off with a lot of water.
For safety, read the safety instructions beforehand,
5. Getting Rid of Spilled Brake Fluid
After removing the bleed bottle, take a proprietary brake cleaner and spray it upon the caliper and bleed nipple. This is to remove any spilled liquid.
Furthermore, you must wipe the rotor clean using brake cleaner so as to get rid of any fluid or fingerprints.
Replace the dust cap onto the nipple.
Top off the brake fluid reservoir one final time, and then replace and secure the top.
Final Word
As you can see, bleeding your bike’s brakes is not such a difficult process. It is something you can actually do yourself. Over time, you will get better at it.
Bleeding the motorcycle’s brakes will ensure that they operate optimally. Brake failure is dangerous and can cause an accident when you are riding.
Therefore, learning to bleed your motorcycle’s brakes could actually save your life!
